Home / Sales Service Support / Electronic locks SUPPORT / OTS 20
OTS 20 (OTS Advance)

FAQ
How does the free lock work?
Each chip used to operate the lock (regardless of its format: wristband, card, fob…) has an identifier number called UID. In turn, each lock is programmed with its corresponding number.
When a lock is locked using the chip, 2 things happen: the lock sends it data and the chip data to the Gateway. This memorises them, creating a link between the two elements. This is why a chip programmed to operate with only one lock would no longer be able to lock any other lock, as the chip is occupied. Also, the lock could not be opened with any other chip, as it remembers the UID that locked it (Lock occupied).
When the opening is done, the chip stops remembering the already opened lock (it is released) and would be ready to close any other free locker. The lock also stops remembering the chip’s UID, leaving it free to be used by any other chip. This breaks the link correctly at both ends.
Note, however, that it is not the same to talk about free and occupied (referring to the memory of the lock) or open and closed (refers to the physical state of the lock). There is a case where the lock can be open and occupied (see FAQ Why does no wristband/card close the lock?).
What is the functionality of the master key (Red) and Service (Green)?
Master key (Red): Once this key is used, the lock is unlocked and frees the last used card/wristband’s memory for another user. It can only be used to open locks. Please note that if you use the master key to open a lock, the bracelet will be occupied, and you will have to re-record it.
Service key (Green): Used to check the lock mechanically. It can open and close any lock in the installation, but it does not release the memory of the last wristband used, so only the last user who closed the lock will be able to open it after use. This key cannot be used to leave the lock open as only the user who locked the lock will be able to use this locker.
Why can’t my card/wristband open the lock?
Pass the service key (green) to check the belongings inside:
- If the lock is wrong, lock again with the service key (green).
- If you want to leave it open, pass the master key (red) over the lock or the user’s own key to release both the key and the lock.
**If the lock does not open with the service key (green), see FAQ Is the lock inoperative? – does not show any flashing
After using the master key (red) or service key (green) does the lock still not open?
Check the flashing of the lock when using the master key:
| GREEN LED |
RED LED | AMBER LED | DURATION | DESCRIPTION |
|---|---|---|---|---|
| 1 flash |
Very short (100ms) | Reading error. Try to use the key again. | ||
| 1 flash | Long (1s) | Key denied: check that the key is properly recorded/is the correct one. | ||
| 3 flashes | 3 flashes | Very short (100ms) | Mechanical error. |
If you have a programmer, carry out a test to check the battery status and configuration.
**In case of mechanical error, check the door adjustment. If you still cannot unlock the door, please contact Ojmar.
Why doesn’t the wristband/card lock any locks?
The wristband/card may be occupied. Check if the key is blank or occupied by reading it in the programmer/Interminal/software. Re-recording wristband using the programmer.
Why does no wristband/card close the lock?
The lock may be occupied. If the service key (green) has been used to open the lock, the lock will still be occupied. Pass the master key (red) to release it.
Is the lock inoperative? - does not show any flashing
The lock has detected a definite low battery. Change the batteries in the lock, check the lock’s status with the NFC programmer (do a test), and verify that the programmer’s time is correct.
How do I replace the batteries?
The lock can detect a low battery. The led will flash 3 times in amber when this situation occurs before each opening and closing cycle. It will carry out up to 9 cycles with a low battery, and on the tenth, it will allow opening but never closing, preventing the locker from getting blocked and having to force it to open it.
To replace the batteries:
- Loosen the Torx screw.
- Remove the battery cover.
- Remove the battery holder.
- Replace the four AA batteries.
- Insert the battery holder.
- Put the cover on.
- Tighten the screw.
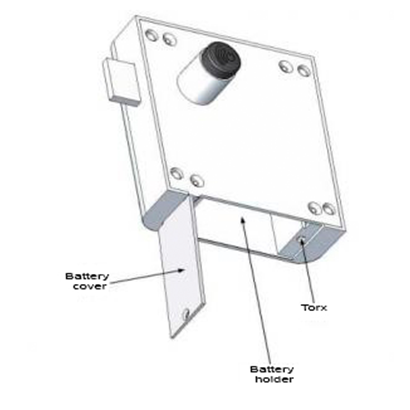
**NOTE 1: The type of screwdriver to be used is a Torx TH10 (tamper-proof)
**NOTE 2: It is advisable to change the batteries within a maximum of 1 minute so that the lock does not lose its configuration.
Do you think you have suffered a theft or fraudulent use of the lock? - Read the lock events
It is possible to read events from an Event Card (see manual) or the Ojmar NFC programmer.
Read events from the programmer: To be able to read the events stored in the Ojmar NFC programmer, the following steps must have been previously carried out:
- Load in the programmer the locks from which the events are to be collected (see point (5) of Section 4.6).
- Connect the timer to any of the locks added in the previous point and press the “Read events” button on the timer.
- EXAMPLE: We want to know what events have happened at lock 1. First, we load this lock into the programmer (see Manual Section 4.8.1). Then we connect the programmer to the lock following the process shown in the previous figure. Finally, check the “Read events from the programmer” tab and click on Submit. OJMAR 80.
- Read events from the key: To read events from an event key, place the key in the reading area of either programmer and press “Send”.
What is the purpose of each card in the installation card kit?
The kit consists of:
- Service Card (green Fob) – to understand how it works, see Question “What is the functionality of the master key (Red) and Service (Green)?”
- Master Card (Red Fob) – to understand how it works, see Question “What is the functionality of the Master Key (Red) and Service (Green)?”
- TEST card: This card is used to check the correct mechanical operation of a lock when it is in its factory settings. If this card works in a lock, the lock is uninitialised and must be numbered (initialised).
- DELETING card: This card allows you to erase all information from the lock and return it to its factory state. After use of this card, the lock shall only be locked/unlocked with the TEST card
- EVENT Card: This key allows you to collect the events (keys used, access times, etc.) stored in the locks. For further information, please consult the manual.
- INITIALISATION card: Allows initialising factory mode locks of the same type as the initialisation key. An initialisation key allows several locks in a row to be initialised by assigning consecutive numbers. For further information, please consult the manual.
How are the locks initialised?
**The locks should have already been created in the software
Follow the steps below to load them: Locks must first be loaded into the NFC programmer to initialise them with the programmer.
LOAD LOCK DATA INTO THE NFC PROGRAMMER
- Connect the NFC programmer to the PC using the supplied USB cable.
- Establish communication with the programmer.
- Choose NFC Controller Type.
- Select the correct communications port. If you donCt know which one it is, check in the device manager Ports (COM and LPT)
- Go to the configuration/locks menu or click on the locks icon.
- Click on the lock name icon to display the locks entered in the software.
- Click on the icon “Upload lock data to the NFC programmer”.
- In the menu where the lock numbers appear, select all the locks or the ones you want to load in the programmer.
- Click on “Update”.
- The message “Updated” will be displayed if the operation is successful.
SEND THE INITIALISATION DATA TO THE LOCKS WITH THE PROGRAMMER:
- Click on the “Lock operations” icon.
- Click on the “OTS Advance” icon.
- Click on the “Initialise” icon.
- Select “Set lock” and select the first lock number to be initialised.
- Press the “Enter” icon.
- Press the lock knob with the programmer.
- Press “Continue” to initialise the next lock.
How do I read lock events?
Locks can store the accesses and actions that have taken place on them. The Ojmar NFC programmer must be used to collect these movements.
The lock data must be loaded into the programmer to read events. To see how to load the locks, see the point “LOADING LOCK DATA INTO THE NFC PROGRAMMER” in the FAQ on how to initialise the locks.
- Turn on the programmer.
- Click on the “Lock operations” icon.
- Click on the “OTS Advance” icon.
- Click on the “Read events” icon.
- Press the lock knob with the NFC programmer and wait until the Result message appears: OK.
- Repeat it on the locks from which you want to read the events.
- Connect the NFC programmer to the PC using the USB cable supplied.
- Establish communication with the programmer.
- Choose NFC Controller Type.
- Select the correct communications port. If you donCt know which one it is, check in the device manager Ports (COM and LPT).
- Enter the events screen in the program, clicking on communications/events.
- Click on the “Read events” button.
- Select “Read events from the programmer”.
- Click on the “Send” button.

Guide video
OTS 20 - Set Up 1
OTS 20 - ROLES & OPERATORS
OTS 20 - Subgroups, Walls and Locks Management
QUERIES / INCIDENTS
Once we receive your query / incident, one of our technicians will contact you.
TECHNICAL ASSISTANCE
Request online or on-site assistance from our technicians.
- General overhaul of the installation
- Resetting of locks
- Training
- Migration of software to new equipment
- Software installation
- Upgrading to new software versions
- Possibility online or in person
One of our advisers will contact you after receiving the request via Ojmar.
After Sales Service, to provide you with the information and prepare an estimate.
REPAIRS AND PHYSICAL DAMAGE
Repair services for out-of-warranty products
- * To guarantee the correct functioning of Ojmar locks and extend their useful life, we offer a repair service.
- * This service has a minimum cost of €65.
- * Before filling in the ADM, make sure that the FREQUENTLY ASKED QUESTIONS do not solve your issue.
SERVICE CONDITIONS
ADM (MATERIAL RETURN AUTHORISATION) FORM
Read carefully the following points before filling in the form:
1. Warranty
We grant the specific product warranty to OJMAR S.A. products, according to our General Sales Conditions. This warranty is a warranty with delivery at the point of service, and does not include any provision for on-site services.
The warranty does not include wear and tear parts. Also excluded from the warranty are all faults caused by damages from transportation, mishandling, unqualified repair attempts, mechanical damage, and the use of unsuitable consumables. Warranty rights do not include either faults that have been caused by installation errors and incorrect handling by the Customer. For everything else, expressly refer to the General Terms and Conditions of OJMAR, S.A.
The warranty of the repairs will be valid for 6 months.
For repairs carried out in the 2-year guarantee period, the latter will finish in any case when this period has ended.
2. In case of repair out of warranty, a repair offer will be sent.
This Service will only be valid forElectronic Solutions.
The offer will include a minimum cost of 65€ in concept of “Cost of Handling, Analysis and Repair Management”. Once the validity period of the offer has elapsed, without a response from the client, OJMAR, S.A. reserves the right to choose between scraping the material or return it without repair, “carriage due”.
3. Returned material must be accompanied by the ADM form.
In the case of material returned without the ADM form, OJMAR, S.A. reserves the right to return it to the sender “carriage due”.
4. Returned material must be sent properly packed.
If the packaging is not correct, the warranty rights are endangered. Resulting damage during transportation means the cancellation of all warranty rights.
5. Transportation costs
OJMAR, S.A. assumes the cost of transport (both collection and return in case of product under warranty). In the event of repairs out of warranty, customer will send the material to be repaired to OJMAR, S.A facilities (adress below) and will assume all costs for both delivery and return of the repaired material (in DDP Elgoibar conditions).
OJMAR, S.A
P.I. Lerún S/N
20870 ELGOIBAR – SPAIN
Attn. Quality Department
6. Description of the error.
The ADM form must include a detailed description of the error (“faulty” or “for repair” is insufficient). In case of an insufficient description, OJMAR, S.A. reserves the right to verify (billing the cost of the service) or to return the material unchecked “carriage due”.
7. Improper claims
In case of improper claims (no errors are detected, manipulations, incorrect assembly or initialization…) the cost of the checking and processing service will be charged. The material will be sent “carriage due”.
8. Terms of Delivery and Service
The delivery and payment conditions of OJMAR, S.A. apply without any change.